
 Enter
the text and the following numbers the appropriate cells. Enter
the text and the following numbers the appropriate cells.
At the moment, don't worry about the presentation of the file. Don't place
dollars signs ($), or bold or any other presentation option. It
will be done after the model is completed.
Insert a row
We forgot the pay checks! Even with the best planning, it's always
possible to forget something. There will be certainly revisions as
well as additions to bring to your model. The next part will show you to insert rows or columns to add
additional data.
Place
the cursor on the grey box indicating column 11.
All the row will be selected. It's possible to carry out operations on several
rows or columns at the same time. Choose the boxes with numbers or letters
that you require.
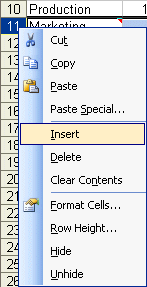
By
keeping the cursor over the grey box for column 11, press the right mouse
button.
From
the list of the available options in the context menu , select the Insert option.
OR
Click
on the grey box on the left border for column 11.
From
the Insert menu, select the Rows option.
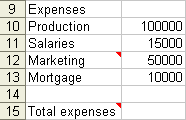
Place
the cursor in the A11 cell and write: Salaries.
Place
the cursor in the B11 cell and write: 15000.
The same thing is possible with columns. It's also possible to add
several rows or column at the same time. It's enough to select so many rows
or columns that you need, in the place where you want to insert them, and to
choose the option Insert.
AutoSum
For a long time, Excel facilitates the addition of numbers in columns and or
in rows thanks to the option of automatic sum. Previously, it was necessary
to write a beginning formula by =sum(followed of vast wished (B3:B5)
followed by a ).
Place
the cursor in the B7 cell.
Press
the  button. button.
Be careful!
Make sure to have the right area (=sum(B3:B6)). The option of autosum has its limits. It's going to stop when the next cell is empty. The option
will not give you the good area if you forgot to register a number. make sure
always to have the area that you want.
For this exercise, if you want the sum the cells of B3 to B6 but you forgot to register a number in the B4 cell. In that box,
the option of automatic sum is only going to give you the range =sum(B5:B6).
It will not give you vast wished. It's for that reason that it's always necessary
to verify if the formula is correct.
Press
the Enter key.
Repeat the same thing for the sum of expenses.
Place
the cursor in the B14 cell.
Press the button.
Excel should show in the bar of Formulas the following formula: =sum(
B10:B13).
Press the Enter key.
Simple Formulas or equations
The next part of the exercise consists in creating the Formulas that are
going to serve for calculating automatically certain values that the user needs.
In every occasion that you have, use Formulas to automate the calculations
of the model. It facilitates you the task and reduces largely the possibility
of errors. The values to be calculated are the raw profit, taxes,
the net profit and the cumulative profit. Before continuing, you can try by
yourself to create the necessary Formulas. You can then verify them with the
text that follows.
To calculate the raw profit, it's first necessary to know the
total of expenses and incomes. These s are already calculated
and you will find respectively in cells B7 and B15. It's enough to create
a formula that subtracts the totals of incomes and
expenses.
Place
the cursor in the B16 cell.
Write
the following formula: =B7-B14.
There is also another way to write this formula by using the cursors of
the keyboard.
Place
the cursor in the B16 cell.
Write =.
By
using cursors or mouse, move the cursor in the B7 cell.
Write-.
By
using cursors or mouse, move the cursor in the B14 cell.
Press
the Enter key.
Even if it would like to do without it, you must pay taxes. For
the example, the tax rate of the company is 30 % of the raw profit. It's necessary
to calculate how much the model owes to the government.
Place
the cursor in the B17 cell.
Write
the following formula: = B16 * 0.3.
OR
Write =B16 * 30 %.
There are two ways of writing this formula. Both give the same result. It's up to you to choose the one that suits you most. You still have to calculate
the after tax profit.
Place
the cursor in the B18 cell.
Write
the following formula: =B16-B17.
The Copy button
You probably know the options to cut copy and paste with Windows. Excel offers
you another way of copying cells or of generating a list of numbers and the
text. It's called the button of copies.
Place
the cursor in the B1 cell.
You go to notice that there is a small square in the lower corner of
the active cell. It's the button of copies.
Place
the cursor on the button of copies in the corner of the B1 cell.
The cursor will change format. It's going to become a thin and black "+".
Press
the left mouse button and move the button of copies up to the D1 cell.

You'll notice that the text "February" and "March" copied automatically
in the C1 and D1 cells respectively. The personalized lists allow
you to accelerate using prepared lists. Excel already holds in its
personalized list. There is already a list of the months and of days. To be
able to add your own personalized lists:
From
the menu Tools, select the Options option.
Select the Custom Lists tab.
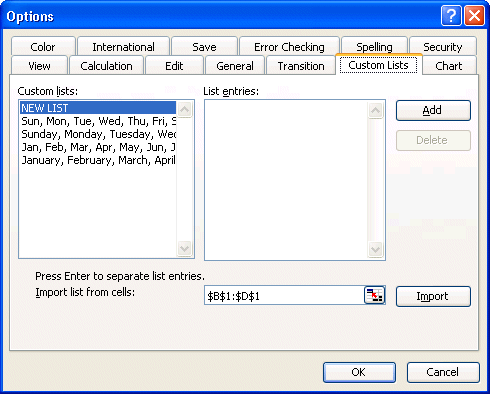
You can from this window add a list, import from cells of your file or delete
those that you don't need any more.
For
the moment, press the Cancel button.
Relative and absolute references
One of the most important aspects during the creation of a model is the possibility
to reuse Formulas by copying out them. However, there are certain Formulas of
that it's necessary "to fix" or "to freeze" a position, a column, one arranged
or both for the position of a cell to be able to effectively reuse a formula.
If you have not already made it, go to see the page on the relative
and absolute references and complete the exercise at the foot of this page.
Place
the cursor in the B22 cell.
This cell will contain the growth rate that will be used to determine
the growth, or the decrease, revenues and expenses for February
and March. In fact, the model will calculate the increase of the profits
of the company for February and March according to this growth rate.
Enter
in the B22 cell: 25 %.
Place
the cursor in the C3 cell.
The formula that will be written in this cell is very important because it
will be copied to all the products and all the expenses
for February and March. It's a matter of taking the value of the previous
month and increasing it with the growth rate in the B22 cell. But careful!
When you copy a formula with a variable or a constant, the value this
one should never be in the formula. It's better put this value in another cell
and to make it reference in the formula. This is much easier to manage if you
should change this value.
But why? It will be even noticeable by the end of the financial year;
it's much easier and more efficient to change the contents of a single cell
than many. Also, if you write the value in the formula, your model will no longer be valid if ever you forget to change the value of a single formula.
Write
the following formula in the C3 cell: =B3+B3*$B$22.
OR
Write the following formula in the C3 cell: =B3 * (1+$B$22).
These two Formulas are going always to give the same result. It's enough to
choose the one that you prefer.
But why is it necessary to put $B$22? The previous formula consists in
taking the value of the previous month, B3 in that box, and to increase
it by the growth rate that meets itself in the B2 cell. It's necessary
to understand that you go to copy this formula horizontally and vertically so
that it's identical for every month and for all the products and the expenses.
Copy a formula
It's now necessary to copy the formula of the C3 cell in the cells of
all the products and the expenses in February and March. Don't
hesitate to re-try if you have difficulties. Everybody has problems copying
and pasting the first times. The operation and always the same:
 Choose
the cell, or range of cells, what you want to copy. Choose
the cell, or range of cells, what you want to copy.
Select
the Copy option.
Choose
the area on that you want to paste to copied content.
Select
the Paste option.
Place
the cursor in the C3 cell.
From
the Edit menu, select the Copy option.
OR
Press
the  button. button.
OR
Press
the right mouse button
From
the context menu, select the Copy option.
You go to notice that the C3 cell is framed by rows that move. It's
normal. It's the way of Excel to warn you that it's the cell that will be copied.
This frame will disappear when you'll make an operation other than paste the
selected cell. You can as often paste as you need it. For this part of the exercise,
you'll need to paste at least twice; for all the incomes and all the expenses
of the company.
Make
a block with the C3 to D5 cells.
From
the Edit menu, select the Paste option.
OR
Press
the  button. button.
OR
Press
the right mouse button.
From
the context menu, select the Paste option.
If the option Paste is not available, place the cursor in the C3 cell
and reprennez the option copy. You can then paste the formula on cells C3 to D5 and several others.
These last operations copied the formula in cells for products. It's again
necessary to copy the same formula for all the expenses. Not
to weigh down the text, the only one of the three options to copy and to paste
will be registered. You can use the technique of your choice, from the menu,
by using a button of the toolbar or the context menu, any time according to
your preference.
Make
a block with the C10 to D13 cells.
From
the Edit menu, select the Paste option.
It's also necessary to copy the formula for the totals of incomes in the C7 to D7 cells.
Place
the cursor in the B7 cell.
From
the Edit menu, select the Copy option.
The formula is copied. It remains only to paste it.
Make
a block with the C7 to D7 cells.
From
the Edit menu, select the Paste option.
Using Copy and Paste, copy the formula in the B15 cell to the C15 and D15 cells.
Copy several formulas
In date, you copied the contents of a single cell in some. Now, you go to copy
the contents of several cells in rows C and D for the months of February and
March.
Make
a block with the B17 to B20 cells.
From
the Edit menu, select the Copy option.
Make
a block with the C17 to D19 cells.
From
the Edit menu, select the Paste option.
If the following window appears, it's not necessary to worry it. Accidentally,
you selected a column or a row too. It's enough to press the OK button and to re-choose the area that you need before pasting it. If you're using Excel 2003 or later, Excel will ajust the range of cells to avoid this error.
There are only two Formulas to be added: the cumulative profit for the first
month and one second for the next months.
Place
the cursor in the B20 cell.
Write
in this one the following formula: =B19.
Press the Enter key.
This formula should demonstrate the profits until now for year. Because it's a question the first month, the will be the same that the net profit.
And now, for the second formula!
Place
the cursor in the C20 cell.
Write
the following formula: =B20 + C19.
Press the Enter key.
It takes the cumulative profit of the previous months and adds the net
profits of the current month. So it's easy to copy this formula for the
next months and always to have the right result.
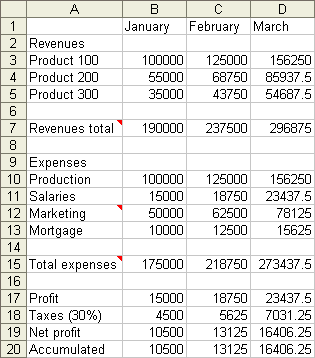
A functional model
The model should look like this:
From
the Tools menu, select the Options option.
Select
the tab View.
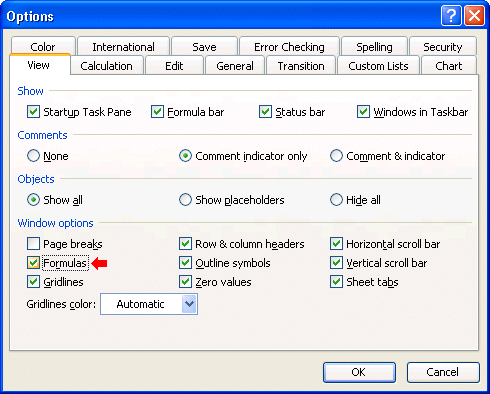
Activate
the option Formulas.
Press the OK button.
The view of the worksheet is now going to show you Formulas instead
of the results of these.

Verify
the Formulas of the previous picture with those of your model.
Bring
so necessary corrections.
To return to normal view:
From
the Tools menu, select the Options option.
Select
the tab View.
Deactivate
the Formula option.
Press the OK button.
And here is the reason you want to create maintaining the reason for being of a spreadsheet by placing the constants and variables separate from the formulas...
You just finished this model when your boss jumps into your office and informs you about
the good news. He says to you: "I just managed to pick up
a big contract from our biggest customer". The growth rate will pass from
25 % to 50 %. Let's see the result.
Place
the cursor in the B22 cell.
Change
the value 50 % or 0.5.
Normally, the entire model should have changed in the following values:
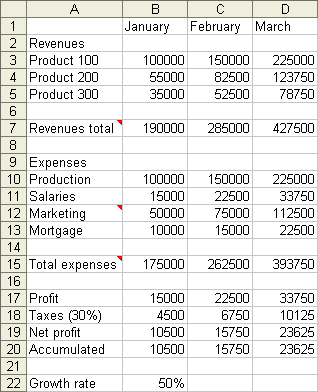
The entire worksheet was recalculated because you changed a single value! Imagine the potential with worksheets that have several variables. For example, you could have a variable to control the
growth rate of each of the products of the company or each of the months, or... You get the idea.
It's as for that reason that you must never put a constant or a variable
in a formula. They can change with time and you should not have to change all the Formulas. It's as
for that reason that you should absolutely master the
notions of relative and absolute reference.
Improve your presentation
Although the model works correctly, it stays some more of work point of view
presentation. The next part consists in adding the name of the company and to
improve the presentation of the model.
Insert a row
It's also possible to insert rows or columns to add of the data or to improve
the presentation of the spreadsheet. The next exercise consists in adding a row,
then one second, to demonstrate you the functioning of this option.
Place
the cursor on the grey box to the left with the row number 1.

From the Insert menu, select the Rows option.
A new row will fit. All the rows down will move downward and
Formulas will fit automatically.
Add
a second row by following the same stages.
It's possible to add several rows or columns that you need in the place that
they will be useful for you. Choose the rows or columns that you
need, in the required place and select the Insert option.
The rows that you have just inserted will serve for adding the name
of the company and to give a little space between the title and the numbers.
Place
the cursor in the A1 cell.
Write
the following text: Company XYZ Inc.
Press the Enter key.
It's possible to centre the text on several rows. With Excel, it's a question
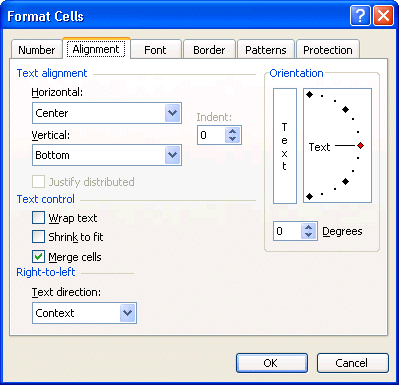
of merging cells and of centring. There is a button for it.
Make
a block with the A1 to D1 cells.
Press
the button  . .
The name of the company is now centred perfectly on several columns. If possible
to merge cells from several rows or columns or both at the same time. You can
use the button on
the Format toolbar. You can also use the options Format, Cell, Alignment Tab and Merge cells . You can also make the opposite to cancel
the fusion of cells.
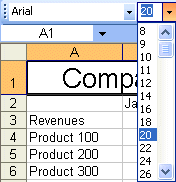
The next part consists in changing the size of the font.
Place
the cursor on the new A1 cell.
From
the list of size of fonts, select 20.
OR
From
the Format menu, select the Cell option.
Select
the Font tab.
Change
the size of the font to 20.
OR
Press
the right mouse button.
From
the context menu, select the Format of cell option.
Select
the tab Font.
Change
the size of the font to 20.
It's now necessary to put the title in bold.
Place
the cursor in the A1 cell.
Press the  button. button.
You can also use the Format menu or the context menu to change the presentation.
To end with the title, you must change the color of the text the
blue.
Place
the cursor in the A1 cell.
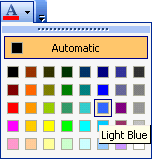
From the toolbar, select the option to change the color of the text.
OR
From
the Format menu, select the Cell option.
Select
the Font tab.
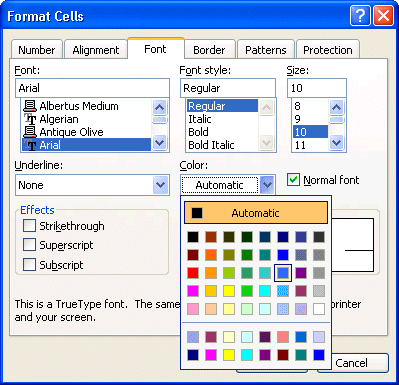
Change
the color to blue.
Once again, there are several ways to carry out the task to reach
the same result. The context menu is a third way. Excel allows you also to
change the color of a character at the same moment. It's necessary:
To
edit the contents of the cell by using the F2 key, the Formula bar
or double click on the cell to be modified.
Make
a block for one or several letters to be changed color.
Use
one of three methods mentioned above to change the color of the selected text.
It's also possible to change the color of text, or the format of presentation
of several cells at the same time. The next part consists in changing the color
of the months in blue.
Make
a block with the B3 to D3 cells.
Use
one of three methods mentioned above to change the color of the selected cells.
Use
the same technique to put the totals in bold.
Autoformat
You have just carried out some exercises to improve the presentation of the
model. But one could make more. Excel of offers too predetermined formats
of presentation that are called autoformat. The next part
consists in putting one of these formats on all the model.
Make
a block with the A2 to D8 cells.
From
the Format menu, select the Autoformat option.
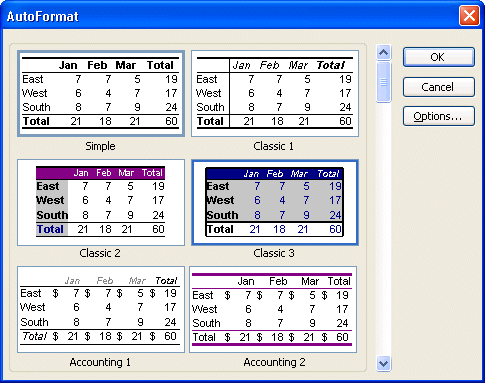
Excel offers you a list of predetermined formats. Having pressed on the Options button, you may apply a style of presentation with or without
the options of your choice.
For
this exercise, select the Classic 3 format.
Press the OK button.
It remains to apply the same format to the other cells of the worksheet.
Make
a block with the A10 to D22 cells.
From
the Format menu, select the automatic format option.
Select
the Classic 3 format.
Press the OK button.
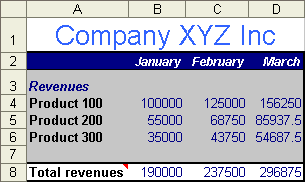
This kind of change sometimes brings some complications. In that box, the
width of columns is too small. It's for that reason that certain cells show
only the character "#". It's in this way that all the spreadsheets warns
to you that the cell is too thin to show correctly the number that it contains.
The width is calculated according to the contents of the block that you selected
and not all the contents of the worksheet. It's so necessary to
adjust the width of cells before continuing.
Scenarios
Now you have an operational model. Let's see how he can be used to compare
opportunities that are offered to you. Could you tell me from both options
below wich one will bring in the most profit for
the company for the first quarter (January to March)?
Keep
the initial revenue values but increase the growth rate to 50 %.
OR
Increase
the revenue of the product 300 from 35 000 $ to 50 000 $ and have a growth rate
of 10 %.
Click on this link to learn more about scenarios.
It's the time to use the administrator of scenarios to compare these two options.
Before, let us look that will be the cells that will be necessary to realize
the scenarios.
B6: initial Value of the product 300.
B23: Monthly growth rate
D21: Cumulative profits of the company until March.
There would be normally more variables if the model was more complete. But
this is only an exercise. It's now necessary to realize both scenarios.
Before we begin, be sure that the value of the B23 cell is 0.25 (25
%).
From
the Tools menu, select the Scenarios option.
Select
the Add button.
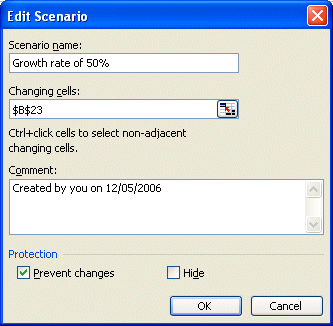
Write
in the box Name of the scenario: Growth rate of 50 %.
Write
in the variables box B23.
There are the other ways to select one or several variable cells. Don't
worry about "$" that appear ($B$23). They don't affect the scenario.
Be careful!
You should only take cells the contents of that are a number and not a formula.
Otherwise, the administrator of scenarios will replace your formula by
the number and your model will not be valid any more.
Press the OK button.
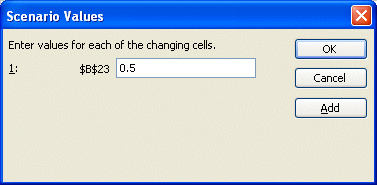
It's necessary to enter the values that cells will take in this scenario.
They are not going to change that of the current model.
Enter
the value 0.5 in the $B$23 box.
This scenario is ended. It remains only to press the OK or Add button.
Because there is another scenario to be entered...
Press
the Add button.
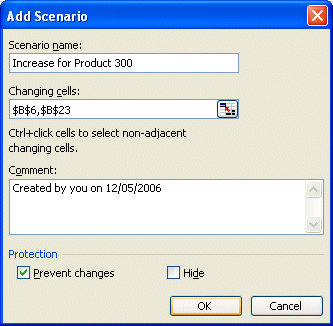
Write
in the box Name of the scenario: Increase for product 300.
Write in the variables box B6; B23.
In this scenario, there are two variables that change with regard to the values
of the current model. It will be necessary to enter the new values the next
window.
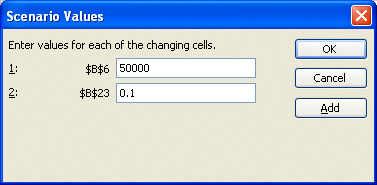
Enter
the value 50000 in the $B$6 box.
Enter
the value 0.1 in the $B$23 box.
Press the OK button.
The administrator of scenarios presents you then the initial window with the
name of both scenarios. You have below the names of scenarios the list of the
variable cells according to the chosen scenario.
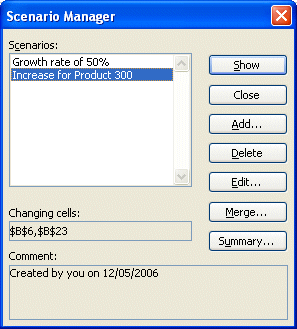
It remains that to see the result.
Press
the Summary button.
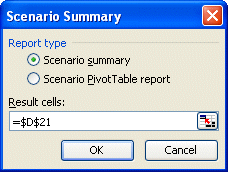
The scenario manager offers you two views of the result: with a summary
or with a pivot table.
For
this exercise, select the option Scenario summary .
Enter
the Result Cell box: D21.
Press
the OK button.
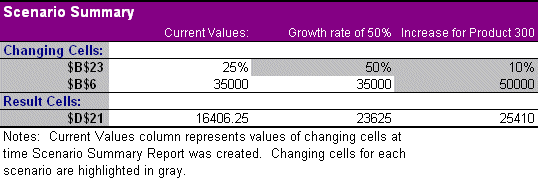
And here it's! The second option makes more profits by the end of March.
However, if the trends should continue until the end of May, it's the first
option that would have become the best. It depends on our point of view and
what's possible in your model.
|