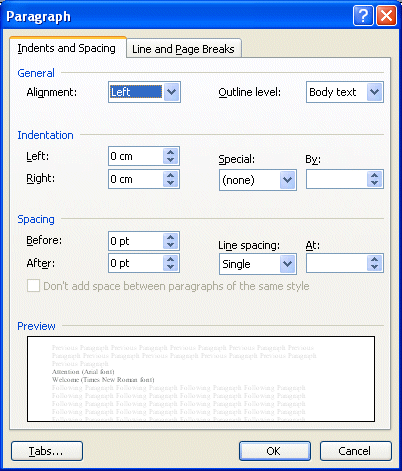
This window offers you several options to control the presentation of a paragraph.
This is much more effective than, using the Enter key at the end of every row! The row spacing, and the other options described above, take place in the paragraphs. To choose several paragraphs at the same time. You should make a block with these paragraphs and choose the options you desire. Page breakThis option is very practical, when you have only some rows of text to be written before you're forced to continue on a new page. Instead of pressing several times on the Enter key, it's better to insert a page break. Furthermore, you know exactly at what place your new page will begin. So, you can always return to the previous page and add of more text if needed.
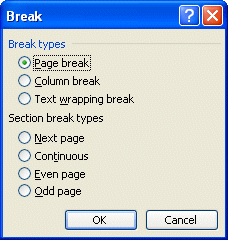
The window above, offers you several possibilities. You can insert a page break, a jump of column or one of the various jumps of section. All these possibilities will be explained in detail at the proper moment. For now, we use a page break.
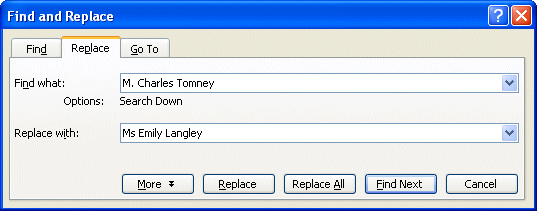
you're now at the beginning of a new page. You'll also see the new page number in the left lower corner of the screen. Search and replaceThis option is very practical, when you need to do the same modification in several places in the document. You could use the command look to find a keyword and then change the word manually. But Word offers you also, the option to replace a word or a series of words, by others. Here is a small exercise.
Ladies and gentlemen, The session on electronic commerce will be given by M. Charles Tomney.
If the text would have been longer, you would have been capable of changing it several times by using the Replace all option. When all the text as been verified, the following dialog box will appear.
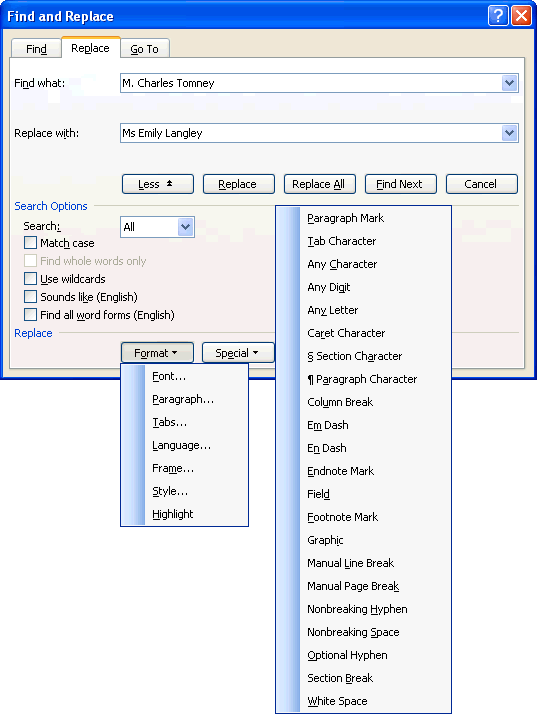
But, you may carry out more specific replacements with the following options.
There are a lot more options to control the searches and the replacements. You can choose a part of the text according to the word, if it's in uppercase or lowercase letters, it's presentation style and the font type. You can experiment with these various options, on your spare time. The compound picture above is to demonstrate you the potential of it. Footnoteit's interesting at times to offer to the reader of the document extra comments or reference to a quotation. It's at this moment that it's practical to use footnotes. Here is a small exercise to demonstrate how to use it.
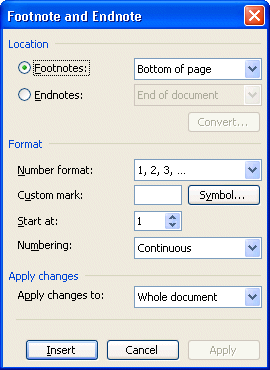
The following dialog box will appear.
The cursor will move at the bottom of the page. You can then write your reference or comments.
For a still unexplained reason, with the Word 2000 version, footnotes may "skip" to the next page. You can always erase the footnotes and
redo them. You only need to erase the footnote indication next to your text.
The comment at the bottom of the page will be automatically erased. End of document noteA note at the end of a document has the same effect as a footnote. However, all
the comments will be shown on the back page of the document.
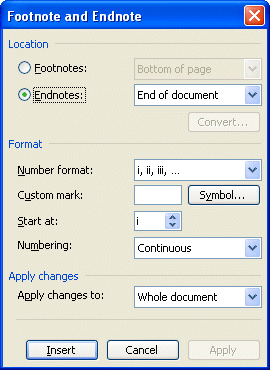
The following dialog box will appear.
From this window, you can choose from many presentation styles and place the notes at the end of the a page, a section or the document. You can also change the type of numbering, or if the numbering should restart after every section or continue for the entire document. The advantages of cutting your document into sections will be explained a later on this Web page. For the purpose of this exercise, there is no change to be brought. The cursor will move at the end of the back page of your document. You can then add the remarks or the comments that you need. You can even write several rows of text. Page Header and footerIt's one of the easiest options to use in order to have a presentation that looks professional. You can place a title, the corporate logo and other information that will repeat itself from a page to another. It's possible to have page header and a footer that are different from another section to another in the same document. it's necessary to know and to master the section breaks that are explained further on this page.
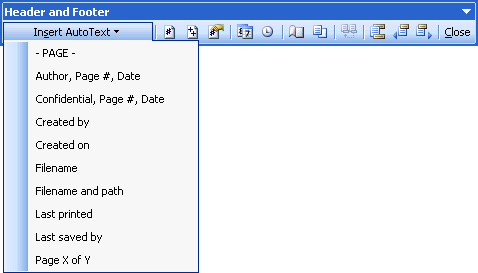
The cursor will move to the header section of the document. If you inserted section breaks, the cursor will take place in the header of the current section. The following bar is also going to appear.
The options The toolbar contains several buttons. Here is a short explanation of their functions.
ColumnsWe are all accustomed to write our documents by writing from one end of the page to the other; in a single column. But some documents like newspaper articles use several columns of text. The next part will show you how to use many columns. Page with several columns:
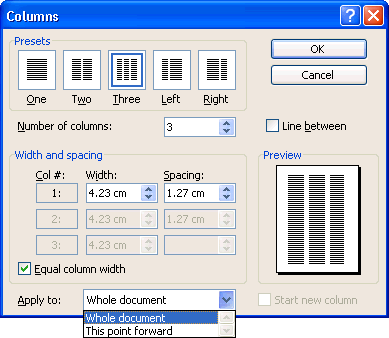
It's from this window, that you have the control of all the elements on columns. The presets section allows you to use columns of predetermined style. You can also change the number of columns as well as the spacing in between them by using the options in the Width and spacing section. You may also insert a dividing row between columns. The preview screen will show you the visual representation of the options chosen. At the bottomof the window, you can choose to apply your choice of columns the entire document, to this section (to leave the document) or from this point on. This last possibility has the effect to create a new section in your document. It "cuts" the document by adding a section with the number of columns that you chose. Sections will be explained a little farther on this Web page. Page NumbersThe numbering of pages is a tool that is a practical reference to the reader. It allows the reader to find quickly a quotation, a chart, an picture or the other one in the document.
The section breaksIt's sometimes interesting to change the presentation of a page or a part of your document. You want to change:
A section break is a logical separation of your document. The other word processors hide this complexity to its users. Regrettably, the users of Word are not privileged either. This causes supplementary problems when a user completely wants to take advantage available options. The section breaks are used for examples, when you must change the number of a columns, the numbering pages of a part of the document, the orientation of the paper, to change the header, the footer of page or the margins of a part of the document. The next exercises consist of using the section jumps to have a document among that is partially in three columns and the following part returns to the standard of a column. Afterwards, the options of header and footer of page will be used only to number a part of the document. This is also going to call back(remind) you the other notions that are covered on this page.
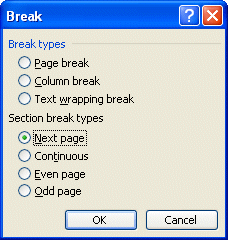
The next window shows all the types of possible jumps.
There is a page break; to continue the text on the following page. There is also a jump of column; to continue the text in the following column when your document, or section, consists of several columns. The others are all jumps of sections. There are four kinds of section break. The section break " Next page " separates the document in several sections, but also creates a new page. The continuous section break separates the same page in several sections. This is practical when you want to change an option such as the number of columns of text for only one left a page. The Odd Page section break separates the document in several sections, but also forces the next page to be an odd page. For example, the beginning of a new chapter is generally on an odd page. The Even page section break separates the document in several sections, but also forces the next page to be an even page. Exercise on sections For example, it's at the beginning of the document that one finds a page a table of contents titles and. Generally, these pages are not numbered. It's on this last possibility that we will concentrate for the next exercise to demonstrate you the advantage to separate a document in several sections. It's also the style of presentation that is often used. The exercise consists in numbering the second page of the document as well as the following ones. The front page will not be numbered.
Noice in the left lower corner of your screen that Word shows now the number of page as well as in that section meets itself the cursor at the moment. Before putting the number of page, you must know that there is a trap. Indeed, if you insert the number of page at once, all the pages will be numbered. Even those that you don't want.
A toolbar should appear with the contents of the heading of the section. Make sure
that the heading that is shown is that of the section 2. It's written in the
upper left corner of the heading. It's important to know where you want to put the numbering of pages. For the example, the numbering will be placed at the bottom of the page. So, the option to be changed before inserting the automatic numbering meets itself at the bottom of the page, in the foot of page. In the right superior corner of the frame of the foot of page, you see the trap that waits for you: " Identical to the previous section ". If you insert the maintaining numbering, it will copy also also in the previous section. Even if you don't want it. So that the numbering of pages begins only from this section, you should deactivate this option. For this(they) make... The text " Identical to previous" should be more shown. It's now necessary to go out of the show of the header and the footer.
If you want to reactivate the option, it's enough to press the same button Numbering pages leave the active option so that the number of page displays on the front page of the section.
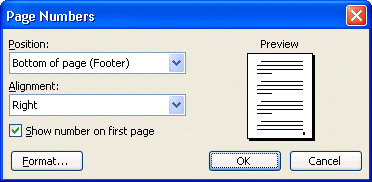
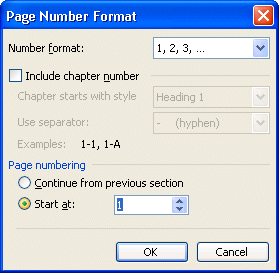
The part of the height indicates the type of numbering of you want (Arabic, Roman numerals or letters). The part Numbering of pages is more interesting. If you select the option " Next the previous section ", the number of page that will appear is that of the number of page of the document. So, if the front page of the section 2 is the fourth page of the document, it's the figure 4 that will appear in the margin of the page. However, if you select the option " From: ", you can choose the figure of departure as the front page of the section. Generally, it's about the figure one. But you can choose the figure of departure of your choice. The other pages will be numbered with regard to the figure of departure of your choice.
You will notice that your pages are now numbered. If you don't see it.
All the following pages will be numbered. |
|||||||||||||||||||||||||||||||||||||||||
| You like what you read?
Share it with your friends. |

