 Write
the following text: Write
the following text:
Introduction
Bla. bla. bla.
Initial situation
Bla. bla. bla.
Determining the cause of the problem
Bla. bla. bla.
Development
Bla. bla. bla.
This is a small example of document. Your document should consist of titles
for each section of your document and the text. To create the table
of contents automatically, you must give a "style" to each of the titles
that you want copied into the table. It's only after this step is completed that you can generate
a table of contents at the appropriate place.
From the text that was written, it's now necessary to put a style in the titles "Introduction",
" Initial situation ", " Determination of the problem " and "Development". As
for a text that has subjects and sub-subjects, table of contents also. It's
for that reason that you must put the right "style" in the right subject.
 Make
a block with the title "Introduction". Make
a block with the title "Introduction".

The introduction is a main subject of any document. So, the appropriate style
is " Title 1 ". At the very beginning of one of the toolbars, you'll
find the list of the styles. It's generally under the "Normal" style.
 Press the small triangle pointing down. Press the small triangle pointing down.
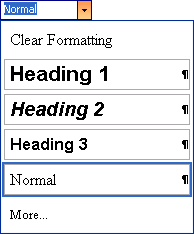
 From the list of the possible styles, select the option " Heading 1 ". From the list of the possible styles, select the option " Heading 1 ".

To be able to have the text in the table of contents, you should give a
style to this text. At the time of the creation or of the update of the table
of contents, Word fetches the text that has a style of type " Title 1 ", "
Title 2 " or " Title 3 " to insert it then into the table of contents. The style
of type " Title 1 " is for the main subjects of your table of contents. The
style " Title 2 " is for the sub-subjects and so on. For this example, there
are only two levels. The main subjects are "Introduction" and "Development".
 Make
the same thing for the text "Development". Make
the same thing for the text "Development".
 Put
the Heading 2 style on the titles " Initial situation " and " Determining the cause
of the problem ". Put
the Heading 2 style on the titles " Initial situation " and " Determining the cause
of the problem ".
When you'll have marked all the titles that you want to find in your table
of contents, you will be able to create it.
 Place
your cursor in the place where you want to place the table of contents in the
document. Place
your cursor in the place where you want to place the table of contents in the
document.
 From
the Insert menu, select the Reference and Index and Tables options. From
the Insert menu, select the Reference and Index and Tables options.
 Click
on the the second tab: "Table of contents". Click
on the the second tab: "Table of contents".
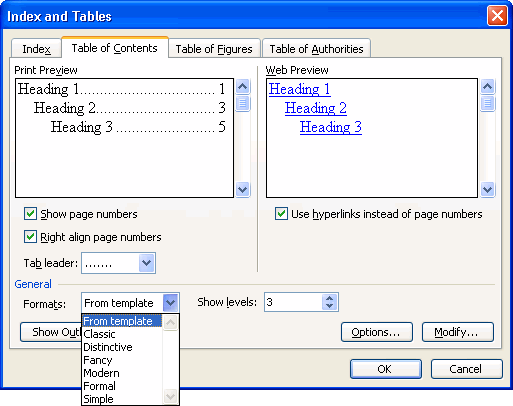
You have to choose a style of presentation as well as to choose the other options.
The outline gives you an idea that will look like your table of contents ended
time. Make sure that your table of contents shows the number of levels that you
need. The following characters help better to align the numbers of pages in
the title that is connected with it. select the style that will go best according
to your needs. Here is the result by using the "From template " format.

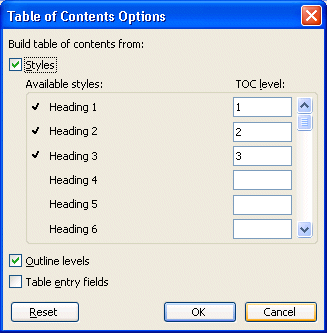
If you press the button Options, you can determine if the entrances(entries)
of the table of contents result from the list of the styles or the fields of
entry of table.
Update the table of contents
If you bring last minute changes to you`re document. For example,
you add a paragraph or pictures. This can change the place of all the titles of
your document. It's so necessary to update it before putting back(handing)
the document or printing it.
 Click on the table of contents. Click on the table of contents.

The text of your table of contents will be selected. This is normal.
 Click on the right mouse button. Click on the right mouse button.
 Select the Update Field option. Select the Update Field option.
OR
 Press
the F9 key. Press
the F9 key.
Word will show you the following screen.
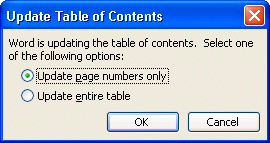
The word processor offers you two possibilities for the update. If you did
not add a text with styles, you can choose the first option: Update the numbers
of page only. If, on the other hand, you added, to remove or to change of the
text for the table of contents, select the second option: Update all the table.
Change the presentation style
You noticed certainly that as you applied a style to the titles of your document
that its presentation changed. You can determine the speed(look)
of your titles to your taste.
 From
the Format menu, select the Styles and Formatting option. From
the Format menu, select the Styles and Formatting option.

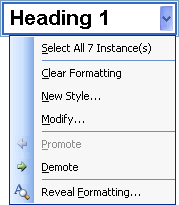
 Select the presentation style you wich to change. In this case, select Heading 1. Select the presentation style you wich to change. In this case, select Heading 1.
 Click on the down arrow button at the end of the box. Click on the down arrow button at the end of the box.
 Select
the Modify option. Select
the Modify option.
 Of
the Format button, select the Font option. Of
the Format button, select the Font option.
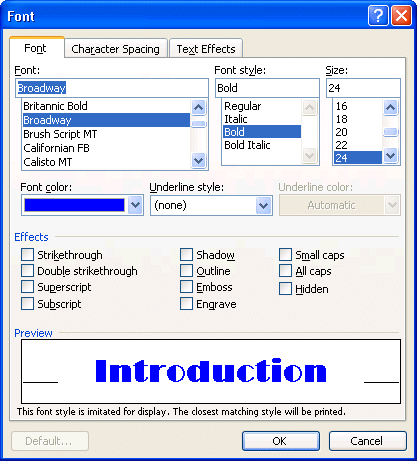
You can modify several aspects of your titles. For the example, we are going
to concentrate on the characters.
 Change
the font as well as the size and the color of the text your choice Change
the font as well as the size and the color of the text your choice
 Once finished change the prensentation style, press
the OK button. Once finished change the prensentation style, press
the OK button.
 To return
to the text, press again the OK button. To return
to the text, press again the OK button.

|


