You can insert pictures into a document in two ways: by inserting a picture
that you have on a USB key or that you created with another application
or by taking a picture from Microsoft's library.
Insert a picture
You can also insert your own pictures.
 Place
the cursor in the place where you want to insert thepicture. Place
the cursor in the place where you want to insert thepicture.
From
the Insert menu, select the Picture option.
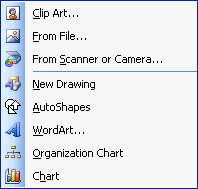
ClipArt |
Microsoft Office contains a vast library of clipArts you can insert into your documents. You can also import more ClipArt from the Office Online Web site. |
From File |
You can also inset pictures such as photos or the company logo into your document. |
From Scanner or Camera |
You can scan pictures or transfer them from a camera directly into your pages. |
New Drawing |
Microsoft Word offers a drawing toolbar than can use to make your own drawings to express your thoughts. |
AutoShaper |
There are some shapes you can use to express your ideas. |
WordArt |
This is a great tool to insert a special title in your text. |
Organization Chart |
Organization charts are sometimes required in business documents. This tool helps you create an org chart very easily. |
Chart |
Somestimes, the best way to look at a vast of numbers is with a chart. Office 2003 has a very simple tool to make charts. |
Select
the From file option.
Select
the right folder where the picture is located.
For the picture above, it's about the C: drive. select the letter of the reader
or you know that there is a picture.
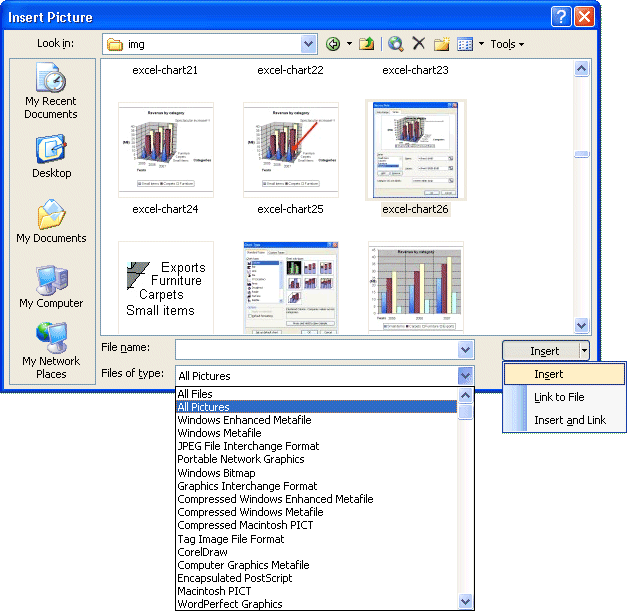
Here is the list of the available pictures. You have a preview of the picture
in the column of the centre to make sure that you select the good picture.
Click
on the name of the picture that interests you.
Press
the Insert button.
And here is! The picture is now in your document.

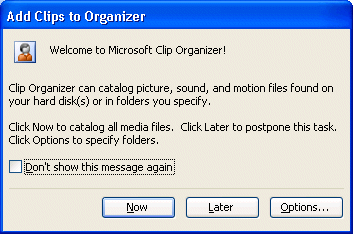
Insert a picture from the library
Place
the cursor where you want to insert the picture into your document.
From
the Insert menu, select the Picture and ClipArt options.
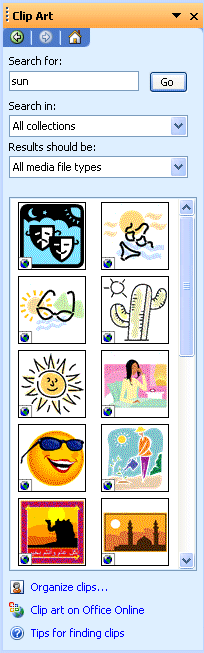
The left column offers you a list of categories of pictures. The column of the
centre shows all the pictures of the selected category.
From
the list of the available pictures, select the one of your choice and press the Insert button.

You can also get even more clip art from the Microsoft Office OnLine Web site.


Change the size of the picture
Although there are several formats of charts, one can group together them
in two types of pictures: vectoriels and points. The pictures of type just in time
consist of little points of color. It's impossible to change the proportions
or the sizes of these pictures. The pictures of vector type consist of data that
save the place of rows the one with regard to the others as well as colors.
It's easy to change the size of these. So, the explanations that follow will
not work for all the pictures, but only for those of the vector type.
Click on the picture.
Squares will appear around the border of the picture.
To reduce the size of the picture
Click
one of the squares in the extremities of the picture.
Press and hold the left mouse button and move the cursor inside the picture.
To increase the size of a picture
Click
one of the squares at the extremities of the picture.
Press
the left mouse button and move the cursor away from the middle of the picture.
Be careful!
To keep the size of the picture proportional, you should more keep it a finger on the Shift key.
Here's another way to change the size of a picture.
Double-clic on the picture.
OR
Click on the picture.
Press the right mouse button.
From the list of options, select the Format Picture option.

Select the Size tab.
You may change the size of the picture by deciding the exact height and width or changing the scale.
Once you've selected the right size, press the OK button.

This picture is 50%
Move the picture
There are two ways to move a picture: by using the mouse or by the options
of the format.
Click on the picture.
Place
the cursor inside the picture.
Press and hold the left mouse button and move the mouse, for its new location.
You will find all the options for the frame in this window. In the section
of dismissal in the automatic row, you can choose to let Word write of the
text around the frame or not. In the section cuts, you can determine the exact
size of the frame or let Word take charge of this detail. There is then a horizontal
and vertical location of the frame.
The Picture toolbar

Here is the toolbar of picture that, normally, appears when you click a picture
of your document. It offers you almost all the options to adjust a picture to
your needs. The text that follows serves for explaining the possibilities of
each of the buttons of the toolbar.
View the toolbar
Here is the procedure to be followed to view the Picture toolbar.
From
the View menu, select the Toolbar option.
Select
the Picture toolbar.
Insert a picture
While pressing on the button  ,
you may insert into your document a picture from Office's library. ,
you may insert into your document a picture from Office's library.
Control of picture
The control picture button  is
to inform the software of the kind of use that you want of the picture. is
to inform the software of the kind of use that you want of the picture.
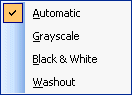 |
It can be used as a watermark to cover
the bottom of a page. The picture can be also converted in tones of grey or
in black and white according to your needs. Generally, it's better leave
the picture with the automatic size(format). |
Contrast
The contrast buttons  control
the variations of color inside the picture. The more there is of contrast, the
more there are variations of colors. Here is it that arrives at a picture when
the contrast is reduced at least. control
the variations of color inside the picture. The more there is of contrast, the
more there are variations of colors. Here is it that arrives at a picture when
the contrast is reduced at least.

Brightness
With these  buttons, you may return a more pale or darker picture by controlling
its luminosity. buttons, you may return a more pale or darker picture by controlling
its luminosity.
Crop a picture
This button (  )
serves for showing only a part of the picture that you need. It's possible to
hide the rest of the picture. Here is a picture before and after the resources
grumble. )
serves for showing only a part of the picture that you need. It's possible to
hide the rest of the picture. Here is a picture before and after the resources
grumble.
Click on the picture.
Press the button .
The cursor changes format.
Place
the cursor on one of the squares of dimensionnement that surrounds the
picture.
Press and hold the left mouse button and move the square inside the picture
to hide an useless part.
repeat
the operation on the picture to hide or show a part of the picture until you're
satisfied.
Rotale left


He're another to rotate a picture.

Click on the picture.
Place the cursor on the green handle above the picture.
Press and hold the left mouse button and move the cursor left to right.
The picture will also rotate. If you also press the Shift key, the picture will rotate at exeact 15 degree intervals (0, 15, 30, 45, 60 ...).
Line Style
The button of style of rows(features) ( ) serves for determining the son-in-law of frame, its thickness and its color
around the picture. ) serves for determining the son-in-law of frame, its thickness and its color
around the picture.
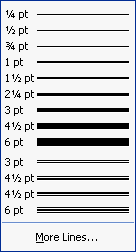

To remove the row border ...
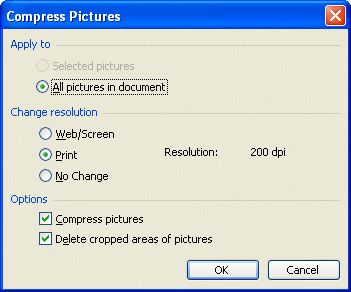
Compress picture
Text wrapping
The button of dressing (  )
controls how the text will surround the picture. Word offers you the types of
following dressing: )
controls how the text will surround the picture. Word offers you the types of
following dressing:
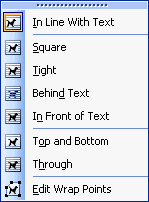 |
With a square border, the text will surround
the frame of the picture but will not go inside this frame.
The moved closer border allows the text to take the outline of the picture.
The border in the fault allows the text to spell over the picture.
No borders
The border in the bottom does not allow the text to take place to the left
or to the right-hand side of the picture.
It's also possible to change the outline of the picture. The text follows
so the outline that you chose. |
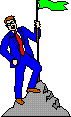
Here is an example of a picture with text wrapping moved closer dressing and a possibility
of modifying the outline of the picture.
Format picture
This button (  )
includes most of the options described below. )
includes most of the options described below.
|
The following window allows you to change the
options on the picture, the dressing, the luminosity, the contrast, the rognage,
the size, the position and the colors of the picture. |
Transparent color
When you import a picture, it's possible that you would want that a certain
color is transparent. While pressing on the button  ,
you can then choose the transparent color of the picture. pay attention. It's
all the points of this color that will become transparent and not only
a part. So, if you have two dark blocks of blue of that you want that a part
is transparent, you should first bring the picture in a publisher(editor)
to change the color of the block that will become transparent. Otherwise,
all that is dark blue will disappear from the picture. ,
you can then choose the transparent color of the picture. pay attention. It's
all the points of this color that will become transparent and not only
a part. So, if you have two dark blocks of blue of that you want that a part
is transparent, you should first bring the picture in a publisher(editor)
to change the color of the block that will become transparent. Otherwise,
all that is dark blue will disappear from the picture.
Restore the picture
You can always put back the picture to its original size and format by pressing
on this button  . .
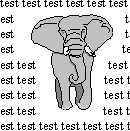
Change the colors of the picture
For a picture of the library
Click on the picture.
Press
the right mouse button.
OR
Press
the Drawing button from the Drawing toolbar if this one is shown.
Select
the option Groups.
Select
the option Dissociate.
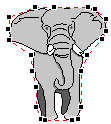
All the rows and the blocks that compose the picture are now independent one to another. It's now possible to change the color of the rows(features)
and the blocks. With a little of work, you can have a pink elephant!
|