Insert a template
Although you wrote all the titles and the points of your presentation, you
may have noticed that the the slide's background is still white! Unless you're making a presentation for snow or fog, this won't do! You must put a comprehensive background on
your slides. PowerPoint uses the term "Slide Design " to describe this important option. Remember that the same background will be used for the entire presentation.
 From
the Format menu, select the Slide Design option. From
the Format menu, select the Slide Design option.
OR
From the bottom of the screen, double click on the Default Design option.
OR
From the Formatting toolbar, press the  button. button.
OR
From the Task pane, select the Slide Design option.
All these files
are PowerPoint's slides. You can create your own templates for your own presentation
needs.
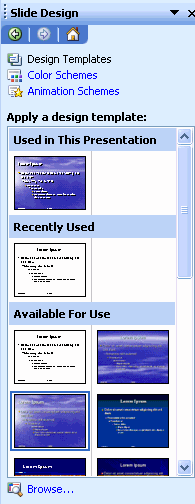 |
The task pane opens to the right of the screen and displays a list of templates ready to be used. You can change templates as often as you want to find the one you prefer. All these files are PowerPoint slides. You can create your own templates for your presentation needs.
Click on one of the templates listd on the first column. A preview of the template appears in the box to the right of the list.
Once you've found the template of your choice, click on it place it in your presentation.
For this exercice ...
From the Format menu, select the Slide design option.
From the list of the templates, select the Clouds template.
PowerPoint will take a moment to change the template of your presentation.
The reason to use this template in particular is that it offers the possibility
of using color schemes that were predetermined by PowerPoint's designers. |
Color schemes
While preparing the templates that you now see, PowerPoint's designers thought of preparing several
" color shemes " for each template to better meet the users needs. So, the same template,
can work with different prepared color shemes.
However, not all the templates offer several color combinations.
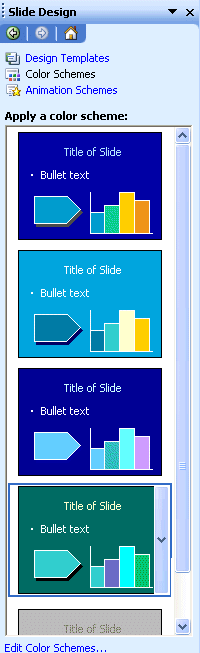 |
From the Task pane, select Slide Design - Color scheme option.
The task pane will appear in the task pane usualy at the right of the screen. You can try several color schemes and decide witch is best for your presentation. You can always change the colors selected in a color scheme to better fit your presentation's requirements.
At the bottom of the task pane, select the Edit Color Schemes option. |
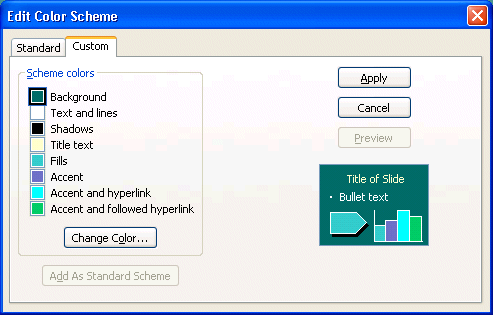 |
PowerPoint offers to change you the color of
each of the elements of the color scheme.
Click
on the color box beside the Title text option.
Press
the Change Color button. |
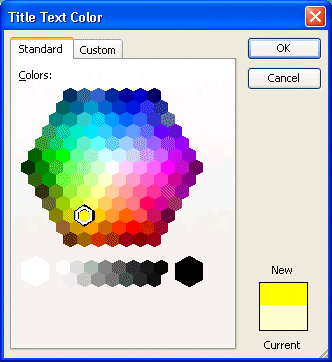 |
Of the list of colors, select a color other than the one that is presently
used.
Press the OK button.
You will be returned to the Edit Color Scheme window.
Press
the Apply button.
You changes will be applied to every slide of your presentation. There is however an exception. The color scheme will not change the color
of a title, or another element of the slide, if you changed it
manually. The color scheme will only change the slides, or elements of a slide, that still have the default color.
For example, change the color of one of the titles on a slide. Then, change the titles's color in the color scheme. All the other titles will change color but not the one you change manualy. |
Change the slide's master template
You may still want to make changes to the template you selected. At first, you chose a template and adjusted the color schemes. You can also add or change elements to the template. For example, you can add the company's logo and name to the template. The next exercice will explain
how to change the slide's master template.
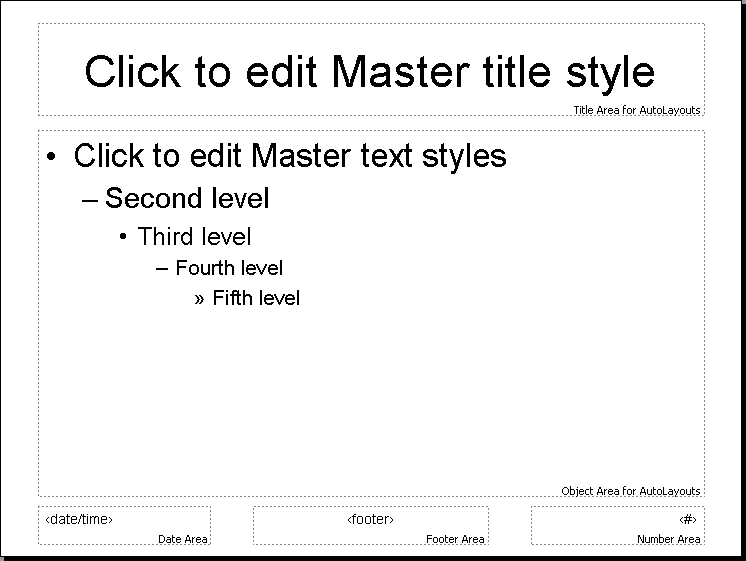
Change the mask of the slide
To modify the templates, you must enter the mask of the title for the
first slide of the presentation or the mask of slides for the others of the
presentation.
From
the View menu, select Master, and Slide Master .
Insert of the free text
You need to create some space before you can add the company's name and logo. You can reduce the size of a text box or remove the text boxes you wont need. In this case, remove the Date/Time, Footer and Number area Text boxes.
Click on the border of these boxes.
Press the Delete button.
you're now ready to add the name of the company
Press
the  button
from the Image toolbar to add some additional text. button
from the Image toolbar to add some additional text.
Place
the cursor to the bottom left of the screen
Make sure that you're not placing the cursor an existing text box that
is already on the slide.
Write
the text: "Company's name".
Insert a picture
The company's logo is missing. Because we have no real pictures for company's
logo, we'll take one from Microsoft's Clipart library. The picture
will be probably too big to be placed next to the name of the company. We will
need to reduce its size and to move it beside the company's name.
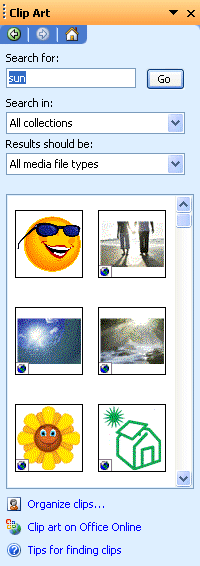 |
From the Insert menu, select the Picture and Clip Art options.
The task pane will help you search among it's library, or later on Office Online, for the item you wish a picture for.
In the Search for box, enter the item your looking and press the Go button. A list of picture will appear below.
Select a pcture from those that are presented to you.
The picture will be added to the master slide. But it's too big. It must be resized smaller to be usefull to your presentation.
Click on the picture. A border will appear around the picture.
Click one of four squares that are located in the corners.
To keep the proportions of the picture while reducing it, press and hold the left button the mouse.
Move the cursor inward on the picture to reduce it
When you'll have the right size for the picture, release the mouse button |
To move the picture.
Place
the cursor inside the picture.
Press
the left mouse button and to move the picture towards the location of your choice.
Release
the mouse button.
You can add the other objects of your choice in the mask of slides. All these
objects will be shown on each of the slides of the presentation.
The animation effects
It's possible in PowerPoint to put different compilation effects on every
point of the slide. Furthermore, animation effects were added to allow you
to animate the various elements that you will find on a slide. You can not only
animate the text, but also the drawings and even the charts. The toolbar of
the animation effects is available from the normal view.
From the Slide Show menu, select the Animation schemes option.
OR
From the Task pane, select the Slide design - Animation scheme option.
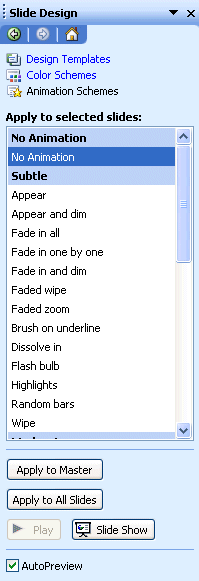
This toolbar allows you to add animation effects in conformance with the
slide. She allows you also to add effects to the text or to choose among some
predetermined effects. You can also change the order of presentation of the
effects or to personalize the effects on each of the objects of the slide.
The exercise that follows consists in putting an effect of animation in the
text as well as in the drawing. Then, look how you may personalize
the effects for your needs. Before putting animation effects, it's necessary
to create a new slide that will contain three elements: the title of
the slide, the text of the slide and the rectangle.
It's first necessary to create a new presentation that will
contain these three elements.
From
the File menu, select the New option.
Under
the General tab, select the New presentation option and press
the OK button.
From
the list of the pagination of the available slides, select the second, lists
in format, and press the OK button.
Click
on the box of the title of the slide.
Write
the following text: " The animation effects ".
Click
on the text box of dots.
Write
" apply to the titles " and press the Enter key.
Write
" apply to the text " and press the Enter key.
Write
" apply to drawn objects " and press the Enter key.
Write
" apply even to charts ".
Click
outside of the text box.
If the Drawing toolbar of is not shown in the screen...
From
the View menu, select the Toolbars option.
From
the list of the available toolbars, select the Drawing toolbar.
Select
the button for the creation of a rectangle  . .
Below
the text, make a rectangle.
There are now all the necessary elements to continue the exercise. The next part consists in putting an effect of animation in the title and in
the text of the slide. An effect of animation will be added to the rectangle
from the menu to personalize the animation effects. This option will be explained
farther on this page.
Give an animation to the title
To put an effect of animation on the title of the slide:
Click
on the title box of the slide.
Click
one of the effects predetermined by the animations toolbar.
Or
Press
the  button
to add an effect of animation in conformance with the slide. button
to add an effect of animation in conformance with the slide.
The figure " 1 "  will appear in the box of the toolbar of the animation effects.
This is to indicate that the title will be the first full of life element of
the slide. During the presentation of this slide, the title of the slide will display with the animation that you chose. The elements of the slide
that have no animation effects or compilation (text) will be shown before
those that have animation effects. Those that have an effect of animation
will appear in the order that you determined. You can verify and change
the order of view of the elements of the slide from the menu to personalize
the animation effects. will appear in the box of the toolbar of the animation effects.
This is to indicate that the title will be the first full of life element of
the slide. During the presentation of this slide, the title of the slide will display with the animation that you chose. The elements of the slide
that have no animation effects or compilation (text) will be shown before
those that have animation effects. Those that have an effect of animation
will appear in the order that you determined. You can verify and change
the order of view of the elements of the slide from the menu to personalize
the animation effects.
Give an animation to the text
To put an effect on the text of the slide:
Click
on the text box of the slide.
Select
one of the effects predetermined by the toolbar of the animation effects.
Or
Press
the  button
to add an effect of animation to the text of the slide. button
to add an effect of animation to the text of the slide.
The number " 2 " will appear to indicate that this text will be the second
element of the slide that will appear with an animation. Because it's about
a text box and because there are several points, at the time of the presentation,
each of the points will appear in his turn with the same effect of animation
as you had chosen. This gives the same effect as the effect of compilation.
So, the public can only the text that appears to the screen and not the following
points.
Personalize the animation effects
The toolbar of the animation effects does not give you access to all the
possibilities; only the most popular. It's possible to have access to a bigger
list of effects and control on these by personalizing these effects.
To
personalize the animation effects of a slide, press the  button. button.
The following dialog box will appear.

This window offers you all the options to personalize the effects animations
on all the elements of your presentation.
In the box in the upper left corner, meets itself a list of all the elements
of the slide that have an effect of animation. The elements that have no animation effects you will find in the list of objects without animation under the
Schedule tab. Arrows pointing upward and downward just in the right-hand side
of the box, allows you to change the order of the animation effects.
Select
an element of the list of elements having an effect of animation.
Press the arrow pointing upward or downward to change the order of presentation
of the selected element.
In the right superior corner of the window, there is a representation
in miniature of the slide. It's possible to have a preview of the effects
of all the objects of the slide. This is to avoid leaving you this window then
to enter mode slide show to see the presentation and then to return to bring
so necessary correction.
At the foot of the window, there are four tabs that control the options of
the animation effects. Those that you most often go to use you will find
under both first tabs.
Click
on the Schedule tab.
Under this tab, you can activate or deactivate the animation effects on the
various objects of a slide. As you can see it on the previous picture, the elements
of title and text of the slide have each an effect of animation. The next part
consists in putting an effect of animation in the rectangle of the slide.
From
the list of objects without animation under the Schedule tab, select
the Rectangle element.
From
the lower right corner of the window, select the Use animations option.
Select
also the Manually option.
The option Manually indicates that you should owe, click the mouse button or
press the Enter key, PageDown or spacebar to show the element with the
effect of animation that you chose. If you select the option automatically,
you should also indicate the number of seconds when you want that the element
appears after the previous element. You can put the value 0. This means that
there is not of periods(delays) between the previous animation and the next.
To remove an effect of animation from an element of the presentation:
From
the list of the order of the animation in the upper left corner of the window,
select the element from that you want to remove the effect of animation.
Click
on the Schedule tab.
In the
lower right corner of the window, select the not use animations option.
Click
on the Effects tab.
For
this exercise, select the Text 2 element of the list of the order of
animation.
Under this tab, you have a list of the possible animation effects. If your
computer is equipped with a card of sound, you can also add a sound effect during
the animation. Later, the animation, it's possible " to shade off " the point.
In the first box, you can determine some type of animation for the selected
object. You can notice that the list of the effects is much longer than that
of the toolbar of the effects animations. In the second box, if your computer
is equipped with a card of sound, you can add a sound with the effect of animation.
The option After the animation allows to change the color or same to
hide the previous points. This technique was called first To shade off the
point. It consists in removing the bombast on the previous points of the
slide to save it on the point about that you speak at this moment. One uses
generally a more pale, more grey color, that gets closer more to the thorough
color of the slide to shade off points.
In the right-hand side of the tab, there are the other options for the presentation
of the text. PowerPoint allows you to have an effect of animation that applies
to a complete row (simultaneously), word by word (By word) or letter by letter
(By letter). Generally, it's better use the option Simultaneously. Although
the others are interesting, it's too much animation for a presentation. never
forget that the important is the contents of your presentation and not the effects
that you add it.
It's always possible to you to have a foretaste of the presentation of the
current slide by pressing on the Preview button.
Click
on the Chart Effects tab.
This tab is only only available when you have a chart on the slide. It's also
possible to animate a chart. You can show the data at one go (Simultaneously)
by series or category. It's also possible to show by element of series one
after another to explain in detail the chart. This option can be interesting
if it's about a small chart with only some points. Nobody wants explanations
on a chart having more than 4 or 5 points.
Still here, you may put various animation effects. But it's the
same for all the chart. The options to add of the sound and to shade off the
data are also available. |