 |
||
Navigation Topics Excercises Tutorials Others Contact Share this page |
Excel - Exercise on PivotTableIntroduction
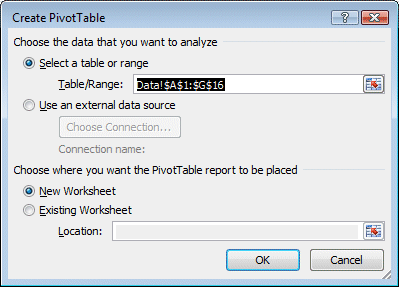
Remove a field IntroductionA PivotTable is a powerful tool to easily generate summary reports from a massive amounts of data. But it has been underused in previous versions of Excel. That's why Microsoft placed it as the first option under the Insert tab in Excel. You can compare the results from one field to another. This option is also dynamic. You can add/change/remove fields from one area to another and PivotTable will recalculate itself to show you the new results. This allows you to "dig" deeper into the data and maybe finds somethings you didn't expect. This page is dedicated to show you how to use this tool with all it's options. The next part of this page is to create a PivotTable. Before we startFor this exercise, you can use the file excel2007-2010-exercises.xlsx on the demonstrations files web page.
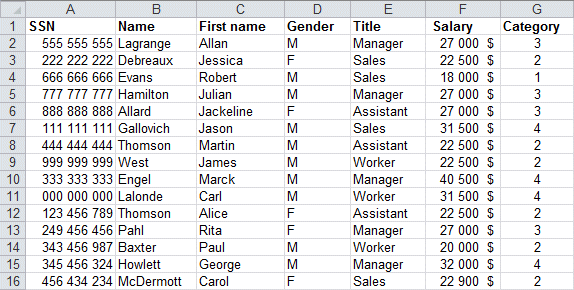
You need to have a data list or some form of database that will be the source for your PivotTable. The data must be placed in a certain way.
|
|
|
In a data list, the field names must be on the first row. No column should be left empty. They must all be filled with a description of the column's content (name, first name ...). The next rows must contain data. You cannot leave a blank row. Every row must contain some data even if a few cells are empty. Make sure that the cells around the Data list are empty. If not, Excel will think that those cells are also part of the Data list. |
![]() Place the pointer into any cell of the Data list.
Place the pointer into any cell of the Data list.
 |
|
 .
.
|
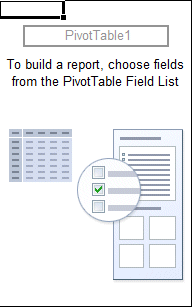
Here's your first glimpse of your PivotTable empty. You need to populate it with fields that are in the PivotTable Field List to the right of the screen or create your own calculated fields. Note : Note: The PivotTable is composed of four areas. Each has a specific function. |
|
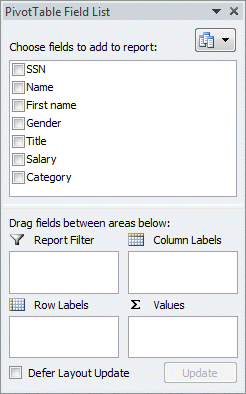
The four areas
| Report filter | Allows you to filter the table data on one or more fields. |
Column labels |
Brings together the common values together and displays the result of each value in a column. |
Row labels |
Displays the results of the synthesis of each value on a separate row. |
Values |
Displays the results of functions required (sum, count, average
...) |
Fill-in the PivotTable
|
|
![]()
The content will automaticaly be placed in the Values area since the content of this field is only values The PivotTable will also choose by default the Sum up the values. You will see how to change the operation a little later in the text.
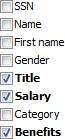
![]() Marck the box beside field Title.
Marck the box beside field Title.
|
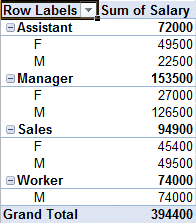
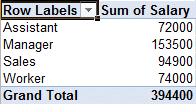
The first description is automatically placed in the Row labels area. Chaque ligne represent l'a of valeurs the field (Administrateur, Ouvrier …) Each row represents the values of the field (Assistant, Manager, Sales, Worker ...)
|
|
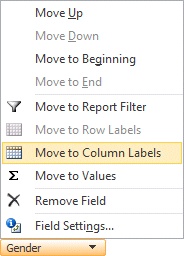
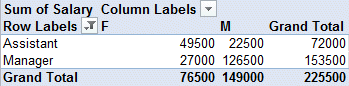
The field is also added in the Row labels area. But it makes the table harder to read. It would be better to move this field to the Column labels area. |
Move a field
|
|
|
|
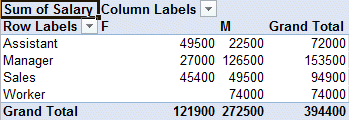
The values in the PivotTable are now easier to read because a field has been moved from one area to another. It's easier to regroup the values in this fashion. |
|
Filter the fields
There are times when you do not want to have a global view but need to filter through to a smaller group of values that hold the information you seek. Le table croisé offre many ways of filter The PivotTable offers several ways to filter through all the data available: from a field in the PivotTable, from a field in the Filter report area and by using Slicers in Excel 2010.
Filter a field located in the PivotTable
![]()
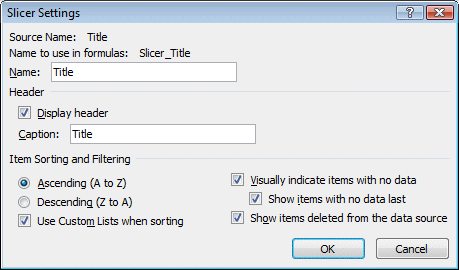
![]() From the PivotTable Field List, press the triangle at the end of the Title field.
From the PivotTable Field List, press the triangle at the end of the Title field.
OR
![]() From the PivotTable, press the triangle at the end of the Row Labels button.
From the PivotTable, press the triangle at the end of the Row Labels button.
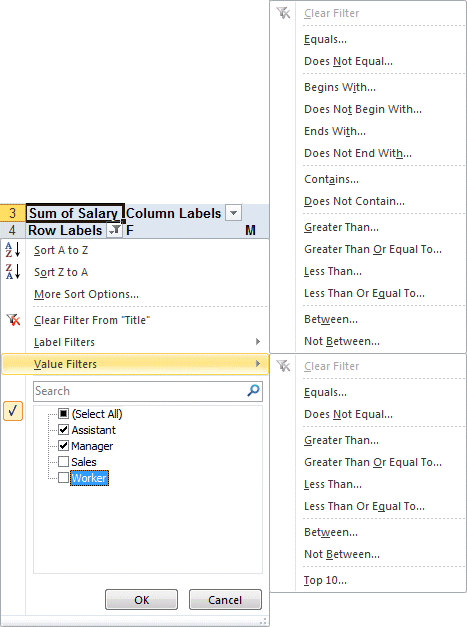 |
You will see the list of options to sort and filter the field you have chosen. Among the filter, you'll see a list of valuesfor the field. You can choose to filter by removing or selecting these values. You can also filter a field through it's labels or it's values. (Equals, Does not equal, Greater Than...)
This will leave you with only the employees who work in the office and not those who are on the road.
You will notice that the number of employees is less than before since there are only wizards and managers. Also take note that there is a filter icon next to Row Labels. |
Remove a filter from a field located in the PivotTable
In addition to filtering an active field of the table, you can also filter directly from the PivotTable. The next procedure will remove a filter from a field.
 |
From the list of options, you can sort or filter the values in many ways.
This will remove the filter and show all the values of the field. |
Apply a filter to a field in the Report filter area
The Category field regroups all the employees salaries into fours groups (from 1 to 4). The next part will filter the PivotTable even if this field is not located in the table or in any areas.
![]() From the PivotTable Field List, move the cursor over the field Category.
From the PivotTable Field List, move the cursor over the field Category.
![]() Press the triangle and the end of the field Category.
Press the triangle and the end of the field Category.
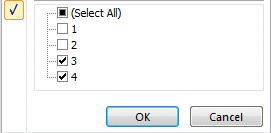
![]() From the list of values for this field, uncheck the boxes beside the values 1 and 2.
From the list of values for this field, uncheck the boxes beside the values 1 and 2.
![]() Press the OK button.
Press the OK button.
![]()
A filter has been placed on the field. But it's not active. The grand total in the PivotTable is the same as before. To have an impact, the field must be placed in one of the PivotTables areas.
 |
|
With the Category field now in the Report Filter area, you will notice that the results have changed. Note also that there is a filter icon next to the Category field in the Report Filter area above the PivotTable.
![]() Return to the Category field and remove the filter.
Return to the Category field and remove the filter.
Filter using slicers
Excel 2010 offers a new way to easily filter through all the data. It's called a "slicer". It "slices" throgh your data by using the fields' values placed into boxes. You decide if you want to include a value by simply pressing a box that includes the value you want.
Add slicers
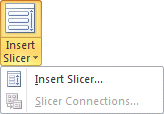 |
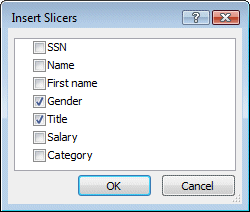 |
Select the fields yu want to filter.
The slicer boxes will be on top of each other. To move the slicer boxes:
|
You can also change the bose's size by pressing and holding the doted boxes on the sides and corners of each box.
 |
Here are the options you can chosse from.
|
Filter by using the Slicers

To acheive the same results
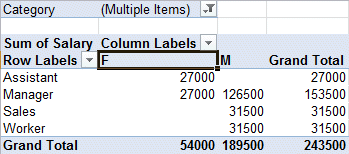
![]() Press the value M from the Gender slicer box.
Press the value M from the Gender slicer box.
![]() Press the value Manager from the Title slicer box.
Press the value Manager from the Title slicer box.
![]() Press and hold the CTRL key.
Press and hold the CTRL key.
![]() Select the value Worker from the Title slicer box.
Select the value Worker from the Title slicer box.
You can use CTRL key to select values individualy. You can also use the Shift key to select many values that are one after the other.
![]() Select the first value of the group.
Select the first value of the group.
![]() Press and hold the Shift key.
Press and hold the Shift key.
![]() Select the last value of the group.
Select the last value of the group.
Each values between the first and last value will be selected. After, you can use the CTRL key to add or remove values from your selection.
![]() To remove the filter, press on the
To remove the filter, press on the ![]() at the top right of the slicer box.
at the top right of the slicer box.
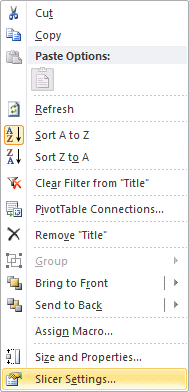
To remove the slicer
![]() Place the cursor over the slicer box you want to remove.
Place the cursor over the slicer box you want to remove.
![]() Press the right mouse button.
Press the right mouse button.
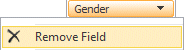
![]() From the contectual menu, select Remove followed by the name of the field (gender, title ...)
From the contectual menu, select Remove followed by the name of the field (gender, title ...)
Remove a field
it's time to remove this a from the PivotTable and continue with the exercice. There are two ways to remove a field from the PivotTable. Select from on of these two ways to remove the Gender field from the PivotTable.
| OR | |
 |
The PivotTable is simpler to read. But it may still not have all the information you need.
Add a field
You're not limited to placing a single field in the Values area, or any other area from the PivotTable. In fact, the more field you have, the more information you can access or filter. The next exercise consist of adding a field in the Values area to know how many people are associated with each value from the Title field. Since this field is already in the PivotTable, you can't just add it a second time in the same way you did it the first time. You must drag it into the proper area. In this case, into the Values area.
![]() From the PivotTable Field List, select one more time the Salary field.
From the PivotTable Field List, select one more time the Salary field.
![]() Press and hold the left mouse button.
Press and hold the left mouse button.
![]() Move the Salary field one more time into the Values areas.
Move the Salary field one more time into the Values areas.
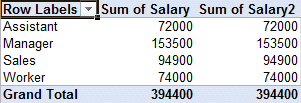
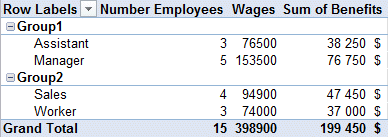
The salary field appears twice in the Values area.
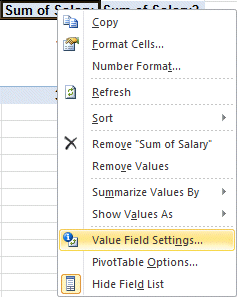
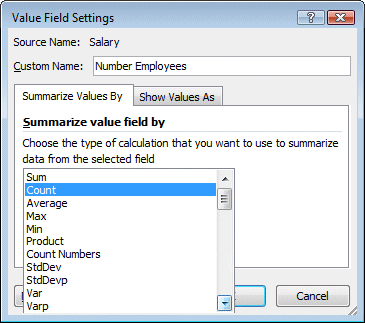
Rename the fields and change it's properties
At first, it looks silly to have the same information twice in the PivotTable. But you need one of these fields to determine the wages and the other to find the number of people who are in each group. The next part consist of changing the name and it's properties
There are two ways to select a field.
|
|
|
You can change the fields' name and the summarize options. Not only can you sum up a fields' value but also count the values, find the average, the biggest (max) or smallest (min) and other operations.
Always select the fields' operation before changing the name. Or the PivotTable will automaticaly change the name of the field to "Operation of Field Name". Also, the name you give cannot be one that is already in the PivotTable Field List.
|
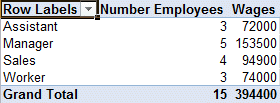
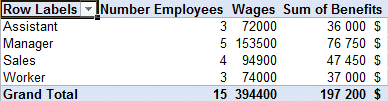
The pivot table now shows the number of employees and their wages. The names of the fields was also changed to better represent the content.
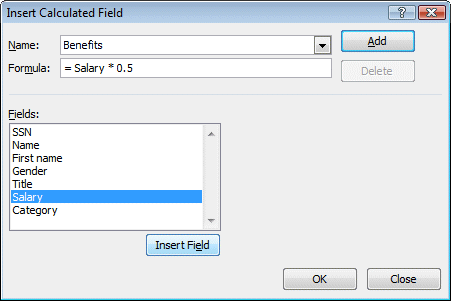
Add a calculated field
You can add calculated fields in the PivotTable to better analyze or interpret your data. The next exercise will add a calculated field that equals 50% of the employees' wages to represent the benefits (life and medical insurance, retirement plan and others) they receive.
|
|
|
Like every other formula in Excel, the calculated field must start with a « = » sign. |
 |
|
Regroup the fields' values
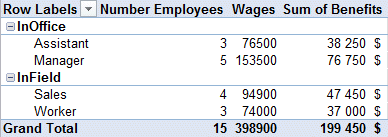
The next step is to create two groups: InOffice and InField. The first group will include the values Assistant and Manager. The second group will include the values Worker and Sales.
 |
|
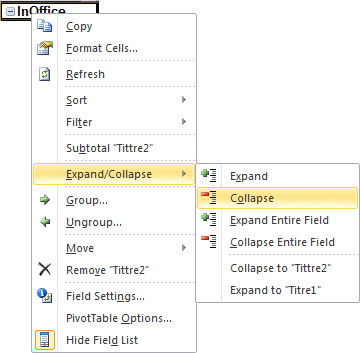
![]()
![]() From the PivotTable's Option tab select the Group Selection option.
From the PivotTable's Option tab select the Group Selection option.
OR
![]() Press the right mouse button.
Press the right mouse button.
![]() From the list of options, select Group.
From the list of options, select Group.
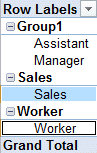 |
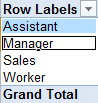
A group has been made with the values Assistant and manager. The The next step is to group the values Worker and Sales together.
|
Change a group's name
![]() Place the
pointer in the cell named Group1 .
Place the
pointer in the cell named Group1 .
![]() Press F2 and change the title to InOffice.
Press F2 and change the title to InOffice.
OR
![]()
![]() Place the
pointer in the cell named Group1.
Place the
pointer in the cell named Group1.
![]() Place the cursor in the formula bar and change the title to InOffice.
Place the cursor in the formula bar and change the title to InOffice.
![]() Changez the name Group2 to InField.
Changez the name Group2 to InField.
Refresh the PivotTable
Unlike the formulas that you uses every day, the PivotTable doesn't update itself automaticaly when you change the underlaying data. You must force the PivotTable to "refresh" itself.
![]()
![]() Return to the Data worksheet.
Return to the Data worksheet.
![]() Go to the F12 cell.
Go to the F12 cell.
![]() Change the salary of Alice Thomson from 22 500 $ to 27 000 $.
Change the salary of Alice Thomson from 22 500 $ to 27 000 $.
![]() Return to the worksheet where the PivotTable is located.
Return to the worksheet where the PivotTable is located.
You will notice that the wages remains the same is $ 394 400. You need to refresh the PivotTable so that it takes into consideration the changes you made to the original data.
|
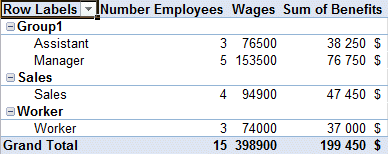
The wages have passed from 394 400 $ to 398 900 $.
The PivotChart
Excel also gives you the possibility to view the PivotTable in the form of a PivotChart.
 |
|
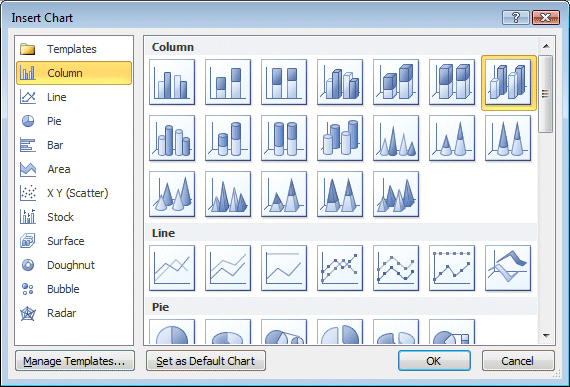
![]() From the list of chart types available, select 3-D Column.
From the list of chart types available, select 3-D Column.
![]() Press the OK button.
Press the OK button.
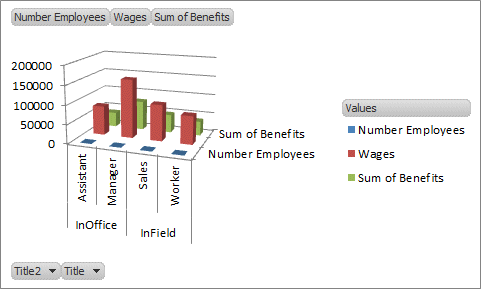
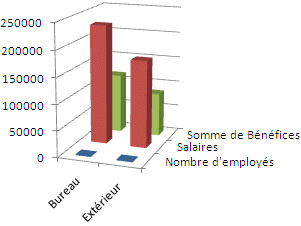
Here is the initial view with all the groups and values you selected.
![]()
|
|
|
The chart offers less details. But it regroups all the values into a single bar. The PivotTable offers more options to represent whatever you want. You must first select one of the four tabs. |
The PivotChart's options.

The first three tabs are the same as when you create a chart. Under the Analyze tab, all these options have already been described except for the fields buttons.

These field buttons allow you to change options to the PivotChart. But they can be in the way when you want to include in in a report or to print it.
All the PivotTable's commands
You have see the most important commands used to make a PivotTable work for you; but not all of them. The next section will give you a description of every command under the PivotTable's two tabs: Options and Design.

PivotTable |
Give a name to the PivotTable. Imporant if you have more than one in your workbook. |
Options |
Determine the PivotTable's option on how it will present the results to the screen. |
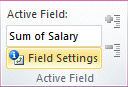
Active Field |
Show the field where the cursor is presently located. |
Field Settings |
Change a fields properties on the way it presents the results depending the the operations (sum, count ...) and presentation (currency, thousands ...) |
Expand entire field |
Mostly used to show the hidden values from a group of fields. It's also another way to add a field to an area. |
Collapse entire field |
Mostly used to hide the values of a field to better show the result from a group of fields. |
Group Selection |
You can group many values together to view the results of the group instead of each value alone. |
Ungroup |
Remove a group and view the results of each value. |
Group fields |
Group the values of many fields together. |
AZ |
Sort in ascending order. |
ZA |
Sort in descending order. |
Sort |
Sort manualy or in a specific order. |
Insert Slicer |
A new option in Excel 2010 to help you filter the data by using boxes with all a fields' values. Select the ones you want to see in the PivotTable. |
Refresh |
Update the PivotTable after you have mato changes to the original data table. |
Change Data source |
Select another data list as the source ofr this PivotTable. |
Clear |
Remove all the fields from the PivotTable |
Select |
Select an item from the PivotTable or the entire PivotTable itself. |
Move PivotTable |
Move the PivotTable to another worksheet or a new worksheet. |
Summarize values by |
What type of operation (sum, count ...) do you want to apply to the field. |
Show values as |
Can show the current values or a a pourcentage of a grand total or a row or column total. |
Fields, Items & Sets |
Create calculated fields or items. |
Pivotchart |
Create a PivotChart from the Data currently in the PivotTable. |
OLAP Tools |
Online analyticac processing (OLAP) More advanced tools for data analysis. |
What-If analysis |
Only available with OLAP data. |
Show/Hide |
View or hide the Field List, the expand/Retract buttons or Field Headers. |

From the Design tab, you can decide to show the total and subtotals, the rows and columns' titles and change the PivotTable's presentation.
SubTotals |
Show/Hide the subtotals after each fields |
Grand Totals |
Show/Hide the grand totals at the end of the PivotTable |
Report Layout |
Select from three report layout for the PivotTable. |
Blank Rows |
Add a blank row after each field to make the PivotTable more readable. |
Row headers |
Place in bold the row headers. |
Column headers |
Place in bold the row headers. |
Banded rows |
View the data with banded rows. May make it easier the compare the results. |
Banded Columns |
Views the data with banded columns. |
PivotTable styles |
After selecting the style options, select a style from this gallery. |
| You like what you read?
Share it with your friends. |